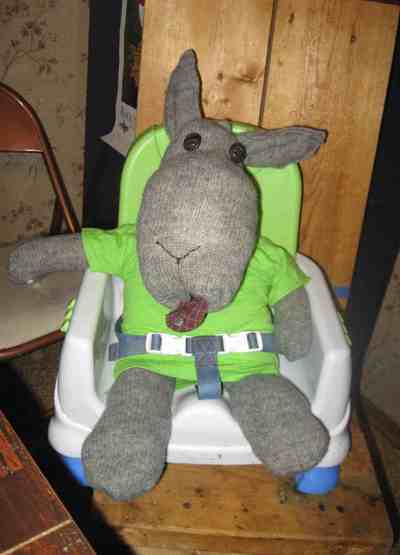
I found this pattern on Burda Styles but I can’t find out much about Jay. Jay said “I unsuccessfully felted an old, holey sweater (unsuccessfully as I think the label lied & the “100% pure virgin wool” label only applied to the wool component of the sweater) and turned it into a very loose interpretation of Elliot Moose. I cut the body out so that the neck was formed of the bottom of the sweater (ie., upside down) and along the side hem of the sweater. The head is an arm– the wrist is actually the inside of the mouth. And then hand-sewed the head to look like a moose. The ears are freehand”. Make sure yours is wool J
Materials:
Old sweater
Old pillow or batting
small scrap of other material for tongue
two button eyes small amount of embroidery thread for nose
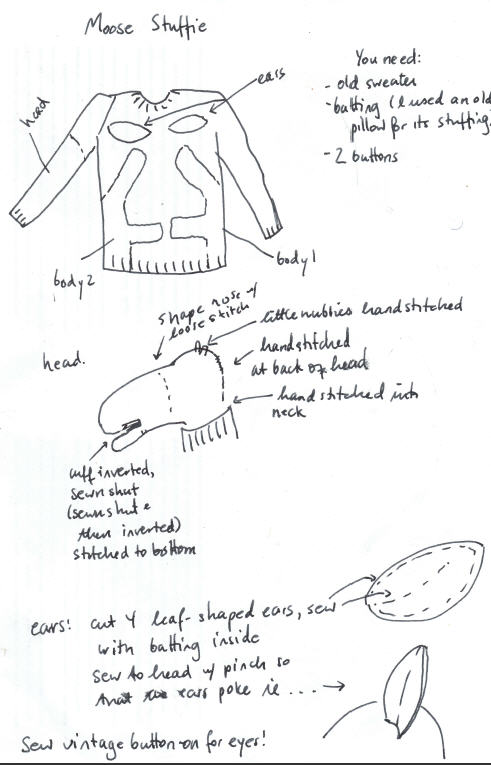
A wonderful, easy-to-make stuffed moose for kids. I used only already-used material, stuff that was destined for the dump, so this was a zero-footprint project! (Thread excluded, though.) Instructions are in the “pattern”. I forgot to mention: sewing up the snout with embroidery thread! I modified an old t-shirt to fit the toy, too. Also not hard stuff…. Please contact me if you need help, though; it’s pretty intuitive stuff but my instructions might confuse! Ps. NEW! Instructions! Including tongue, which I forgot to mention!
1. Cut pattern. The two body pieces are cut on the seam of the sweater, with what will
be the animal’s neck on the ribbing of the waist of the sweater.
2. Sew wrong sides of body together, invert, and stuff.
3. Cut arm off of sweater. Sew “tongue” into wrong side wrist of sweater, closing off wrist
in the process, preserving good side of sweater for outside of head. (I used the cuff of
an old flannel shirt for the tongue.)
4. Tuck wrist ribbing of sleeve and tongue into sleeve; tack down the back of the mouth
to the underside of the moose’s mouth. Stuff so that the nose becomes elongated
and mooselike.
5. Loosely hand stitch around moose’s nose to preserve the big nose. Sew buttons just
above the line of stitching for eyes. Embroider the nose and cleft.
6. Stitch the little nubbins on the head above the eyes. Fold together the edges of the
back of the head, sew together by hand.
7. Make ears by cutting four teardrop-shaped pieces of sweater. Sew outer edge and
then stuff, sew line into ears. Hand sew to head on a curve so that the ears stand up.
Placement should be in line with nubbins, more or less.
8. Stuff the head into the neck, adding more stuffing if necessary. Hand sew neck ribbing
so that the head stands up and looks nice.
9. I cut down an old t-shirt to fit Elliot.
10.Take a picture and post for everyone to see!
oh, how darling! what a great pattern… thanks for sharing.
me! i’m the creator!