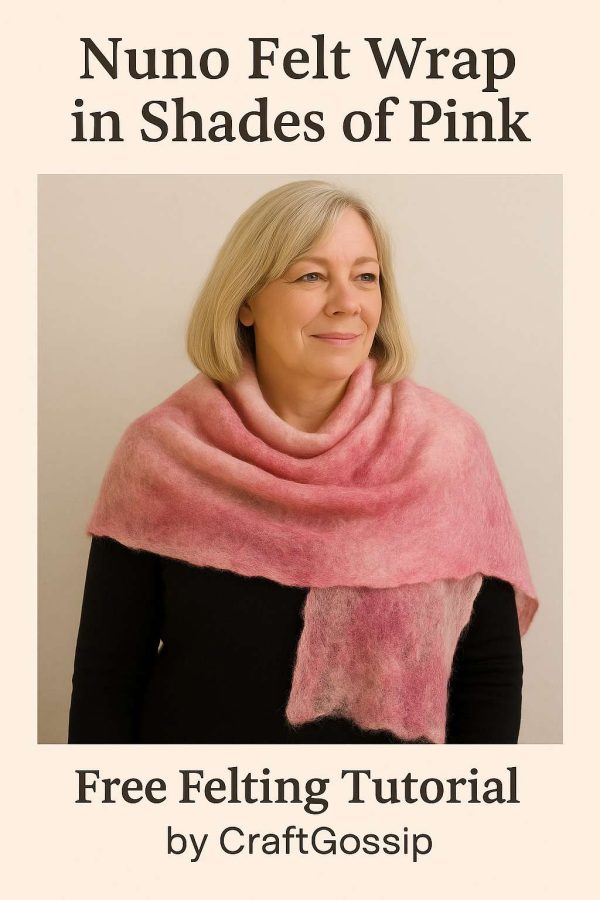
There’s something truly luxurious about a Nuno felt wrap — that soft, crinkly texture, the way the wool fuses with silk, and the dreamy play of color and light.
This technique blends the warmth of wool with the sheer elegance of silk fabric, creating a lightweight wrap that drapes beautifully. Today we’re making one in romantic pink tones — think rose, blush, and soft berry — perfect for spring mornings, cozy evenings, or gifting to someone special.
If you’ve done wet felting before, this project will feel familiar, but if you’re new — don’t worry. Nuno felting just adds one simple (and very satisfying) step.
What Is Nuno Felting?
“Nuno” comes from the Japanese word for cloth. It’s a wet felting technique that bonds wool fibers into a lightweight fabric, usually silk chiffon or gauze.
As the wool shrinks during felting, it pulls the silk with it, creating those gorgeous ruffles and textures Nuno felt is known for.
The result is airy, drapey, and incredibly soft — like wearable art.
Materials You’ll Need
Base Fabric:
- 1.8–2 meters of silk chiffon or silk gauze in white or pale pink (lightweight fabrics work best)
Wool:
- 50–70 g fine Merino roving in shades of pink — mix blush, rose, and raspberry for depth
- A few wisps of white or pearl wool to soften the tones
Extras (optional):
- Silk hankies or silk threads
- Viscose or bamboo fiber for sheen
- Lace snippets for texture
Felting Supplies:
- Warm soapy water (a few drops of dish soap)
- Bubble wrap or bamboo mat
- Tulle/netting
- Spray bottle
- Rolling pin or pool noodle
- Towels
- Rubber gloves
Step 1: Prepare Your Workspace
Lay down a towel, then a piece of bubble wrap (bumpy side up).
Smooth your silk fabric on top, making sure there are no wrinkles.
If your silk is slippery, lightly mist it with water to help it stay in place.
Step 2: Plan Your Design
This is where your creativity shines.
Lay your wool fibers in soft wisps across the silk. You can create gentle color gradients or flowing stripes that run the length of the wrap.
Design idea:
Start with pale blush at one end, blending into rose and finally deep berry pink at the other.
You can also sprinkle in bits of white wool or silk fiber to create highlights and texture.
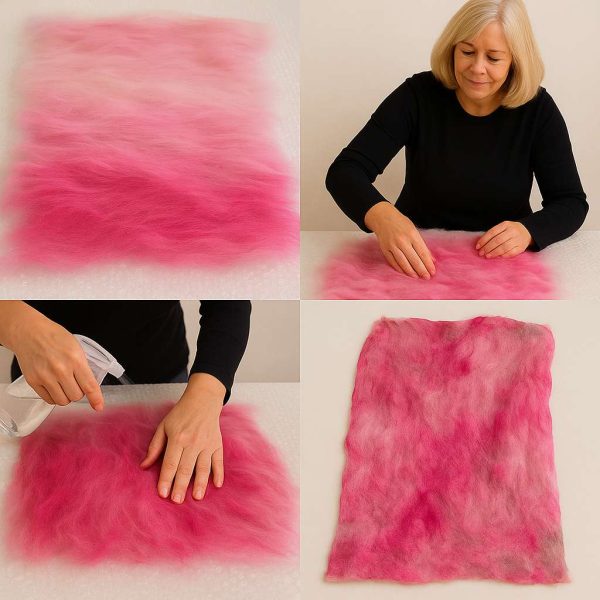
Step 3: Wet It Down
Use your spray bottle to dampen the wool and silk with warm soapy water.
Gently press the fibers so they flatten slightly against the silk.
Cover with a layer of tulle to hold everything in place.
Rub gently with your hands or a piece of bubble wrap for about 5–10 minutes to start the bonding process.
You’ll see the fibers begin to “hug” the silk — that’s exactly what you want.
Step 4: Rolling the Wrap
Roll your project (silk and all) around your pool noodle or rolling pin, securing it with ties or elastic bands.
Roll about 150 times, then unroll and check.
Flip it over, roll from the opposite end, and repeat.
This even rolling helps the fibers felt evenly into the silk.
Keep going until the wool and silk feel securely joined — you’ll see gentle puckering forming across the surface.
Step 5: Fulling (Shrinking & Texturing)
Once the fibers are bonded, it’s time to full the wrap to create that classic Nuno texture.
Rinse it in warm, then cold water to shock the fibers.
Gently scrunch, stretch, and rub sections with your hands.
This stage gives you those beautiful ripples and drapey movement in the finished piece.
When it’s the texture you love, roll it in a towel to remove excess water and lay flat to dry.
Step 6: Finishing Touches
When your wrap is dry, you can trim uneven edges or leave them organic for a handmade, natural look.
Steam press lightly on a silk setting to smooth, but don’t over-flatten the texture.
Optional: Add silk fringe or a needle-felted flower to one corner for extra charm.
Project Notes & Color Inspiration
For this project, we used a base of ivory silk chiffon with layers of blush, rose, and raspberry Merino wool, softly blended for a watercolor effect.
Other stunning color palettes to try:
- Soft lavender, plum, and cream for a vintage feel
- Coral and peach for summer warmth
- Grey and silver for elegant winter tones
Why You’ll Love This Technique
Nuno felting is incredibly forgiving — if your wool placement isn’t perfect, it still turns out stunning.
Each piece is one-of-a-kind, full of movement and tactile beauty.
And the best part? It’s lightweight enough to wear in every season, yet still cozy when there’s a chill in the air.
You’ll find yourself reaching for your handmade Nuno wrap again and again — not just because it’s beautiful, but because it carries that quiet satisfaction of something made slowly, lovingly, by hand.