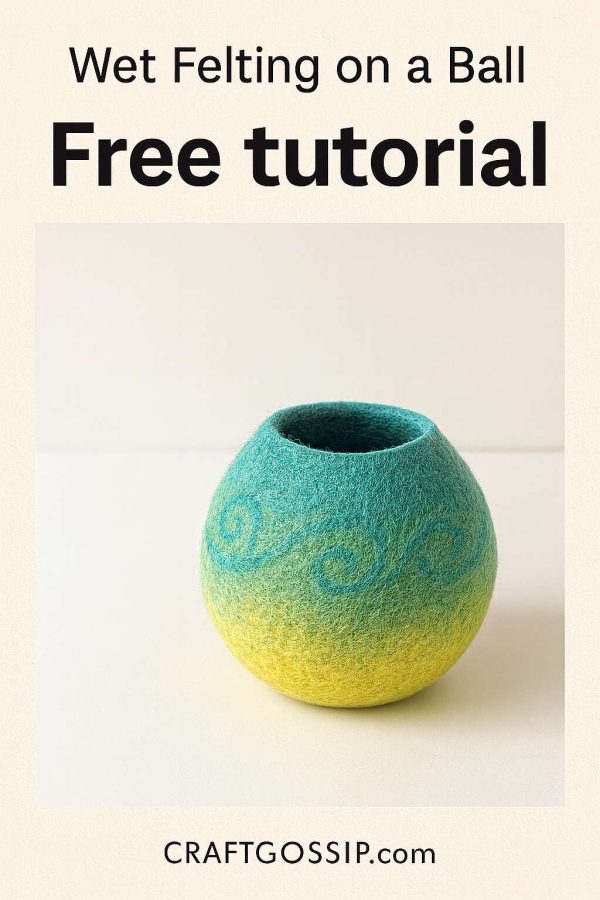
Ever tried shaping a flat felt project into a neat bowl or vase, only to end up with something that looks more like a floppy pancake than a sculptural vessel? We’ve all been there. Felting around a resist can be tricky, especially when you’re still getting the hang of managing edges and shrinkage. But here’s the game-changer: wet felting on an inflatable ball.
By using a ball as your base form, you can skip the guesswork and go straight to creating a beautifully round, hollow felt vessel with seamless structure and even walls. This is an easy and fun project for beginners and a refreshing approach for experienced felters who want to perfect their 3D shaping skills.
This project takes around four hours (plus drying time), and it’s a satisfying mix of art, texture, and a little soap and water therapy. Once finished, your vessel can be used as a decorative bowl, light shade, planter sleeve, or simply as a sculptural accent for your craft space.
Why Felt on a Ball?
Working on a ball means your project stays three-dimensional from start to finish. There’s no folding or flipping resist, no uneven seams, and no surprises when you remove the template. The ball keeps the wool stretched and even while allowing you to control how the fibers shrink and tighten. It’s also a fantastic way to understand how felt naturally forms and shapes when it’s encouraged in all directions.
Plus, let’s be honest — it’s fun. There’s something incredibly satisfying about rolling and rubbing a wool-covered ball until it transforms into solid felt. It’s part science, part magic, and 100% addictive.
What You’ll Need
Felting Equipment
- An inflatable rubber ball, roughly 8” (20 cm) in diameter
- Ball pump and pin for inflating and deflating
- Felting mat (bubble wrap, solar pool cover, or bamboo mat)
- Two large bowls or buckets (about 4 litres each)
- Warm water and a gentle soap (Murphy’s Oil Soap or olive oil soap works beautifully)
- Sponge or soft cloth for cleaning up water
- Nylon gauze or tulle netting (not fiberglass)
- Toothpick
- Jar lid or round cookie cutter
- Chalk or disappearing fabric marker
- Sharp scissors
- A couple of towels — one under your work surface, one for drying hands
- Optional: washboard for fulling, knee pads if you’re felting on the floor
Choosing Your Wool
For a medium-sized vessel, you’ll need around 100–110 grams of wool roving. Choose soft, fine fibers like Merino or Corriedale for best results, and add small amounts of silk top or blended fibers for decoration and sheen.
A good layering guide looks like this:
- 60 g yellow wool for the base
- 20 g green wool for the second layer
- 20 g turquoise wool for the final layer
- 8–10 g of silk top or accent fibers for decoration
Layering different colors also helps you see where your wool may be thin and need reinforcement.
Setting Up Your Workspace
Find a table or floor area where you can splash around without stress. Lay a towel down, then your felting mat on top. Position your two bowls — one for warm soapy water and the other to hold your ball while you work.
Mix about 2 tablespoons of soap into 3–4 litres of warm water. Have your sponge nearby to clean up spills, and make sure the ball is resting securely on a jar or cup to keep it steady.
Inflate the Ball
Inflate your rubber ball to full size and insert the plug. Stick a toothpick gently into the plug — this will mark the top of the vessel as you work. You don’t want to push it in too far, just enough to keep track of your opening spot.
Make sure your ball material is flexible enough to deflate easily later. If it’s too rigid, you’ll struggle to remove it once the wool has felted tightly around it.
Laying the First Layer of Wool
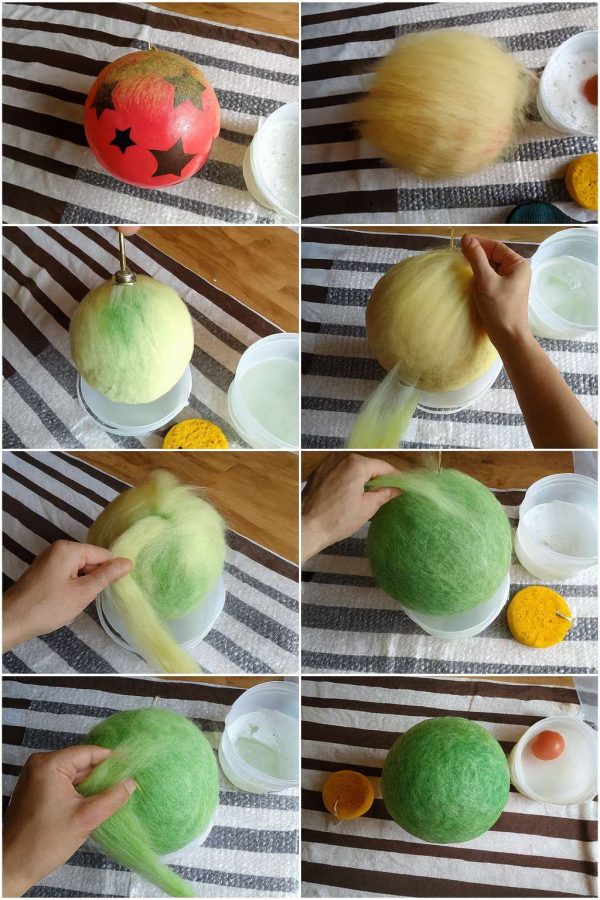
Begin by pulling small, thin tufts of roving and laying them like roof shingles around the top section of the ball. Overlap them slightly and change the direction of the fibers with each patch to build strength.
Work in small sections — about one-quarter of the ball at a time — so your wool doesn’t slip off. Once you’ve placed a section, sprinkle it with warm soapy water and press it down gently with wet fingers to remove air pockets. Continue until the entire surface of the ball is covered with wool.
Smoothing and Checking Coverage
Rotate the ball slowly, adding wool where you see thin spots. If you can see the ball’s color through the wool, add another tuft. Once the whole ball is covered, gently squeeze it to remove excess water. It should be evenly damp, not dripping.
The soap helps the wool fibers start binding to each other, so don’t be afraid to reapply soapy water if needed.
Adding the Second and Third Layers
Repeat the process with your next color of wool, laying the fibers in a different direction for extra durability. After the second layer, feel around for thin or uneven areas and add more wool. Then repeat once more with your final color.
Each new layer should feel a little smoother and tighter than the last. By the end, your ball will be evenly covered and slightly tacky to the touch.
Decorating Your Vessel
Now comes the fun part — decoration. You can add streaks of silk top, wispy bits of contrasting wool, or even felt cutouts like stars or stripes. Just remember that less is more; thick clumps of decorative fiber may not felt properly.
Lightly mist your decorations with warm soapy water to help them cling to the base layers. The ball can be a little slippery, so take your time and rotate gently.
Securing the Wool
Wrap the entire ball in a piece of nylon gauze or tulle and tie it snugly around the top with string or an elastic band. This keeps all your wool layers in place as you begin felting.
The gauze should fit firmly but not distort the ball’s shape.
The Felting Begins
Using warm, soapy water, start to gently rub and roll the ball over your bubble-wrap mat. Move your hands in circular and back-and-forth motions, turning the ball constantly so every area gets even pressure.
After about 15 minutes, the fibers will begin to tighten and form a skin. When the wool holds its position and feels slightly resistant under your fingers, it’s time to remove the gauze before it starts felting into your design.
Continue rolling and rubbing directly on the wool, applying a bit more pressure each time. Re-wet it occasionally with warm, sudsy water to keep everything slick and soft.
Cutting the Opening
When your felt is firm but still flexible, it’s time to cut the opening. Trace around the top with a cookie cutter or jar lid using chalk, then cut carefully with sharp scissors. Start small — the hole will widen naturally as you continue felting and shaping.
You can save the cut-out circle of felt for use in another project, such as a brooch or decorative patch.
Felting the Edges
Rub the opening edge gently with your fingers and thumbs, applying warm soapy water to smooth the fibers. This step helps prevent fraying and gives your vessel a tidy, professional look.
Fulling and Firming the Shape
Now increase the intensity. Roll and rub the felt more vigorously on your mat, pressing down harder to encourage shrinkage. Rotate the ball constantly so it firms up evenly.
You can switch to a washboard at this stage if you want to speed up the fulling process. The texture of the board helps the fibers interlock tightly, creating a sturdy, durable vessel.
Rinsing and Neutralizing
When the felt feels dense and holds its shape, rinse it thoroughly in clean water until all soap is removed. Then soak it in a solution of 2 litres of water and one teaspoon of vinegar for about 15 minutes. The vinegar helps restore the wool’s natural pH balance and gives your felt a cleaner finish.
Rinse again in cool water.
Drying the Vessel
Deflate the ball slightly, then reinsert it into the vessel. Inflate it again until snug — this helps maintain the round shape as it dries. Set it on a jar or bowl to drip dry. If drying indoors, place it over a container to catch any dripping water.
Let it dry completely, which can take a day or two depending on humidity.
Finishing Touches
Once the vessel is dry, insert the pump pin again to deflate the ball fully. Gently remove it from the felt through the top opening. Shape the base of the vessel by pressing it softly on a flat surface so it can stand without rolling.
You now have a beautiful, seamless 3D felt vessel — smooth, strong, and ready to decorate your home.
Creative Ways to Use Your Felt Vessel
- Planter sleeve: Pop a small potted plant inside for a natural, woolly touch.
- Lamp shade: Slip it over a small LED base for a soft, diffused glow.
- Storage bowl: Keep your craft table organized in style.
- Art piece: Create a gradient color pattern or add felt appliqué for a sculptural look.
Felting Tips for Beginners
- Keep your layers thin — too thick, and they won’t felt evenly.
- Use different colors per layer so you can spot thin patches easily.
- Always check the temperature of your water — warm, not hot, is best for control.
- The vinegar rinse is key for soft, clean felt.
- Don’t rush drying — good felt needs time to set its final shape.
This simple but powerful felting technique opens up a world of creative possibilities. Once you master wet felting on a ball, you can scale it up for bigger vessels, shape it differently for organic forms, or use partial cuts to make bowls and lampshades with character.
So grab that rubber ball, roll up your sleeves, and prepare to get soapy — because once you try this, you’ll never go back to flat felting again.