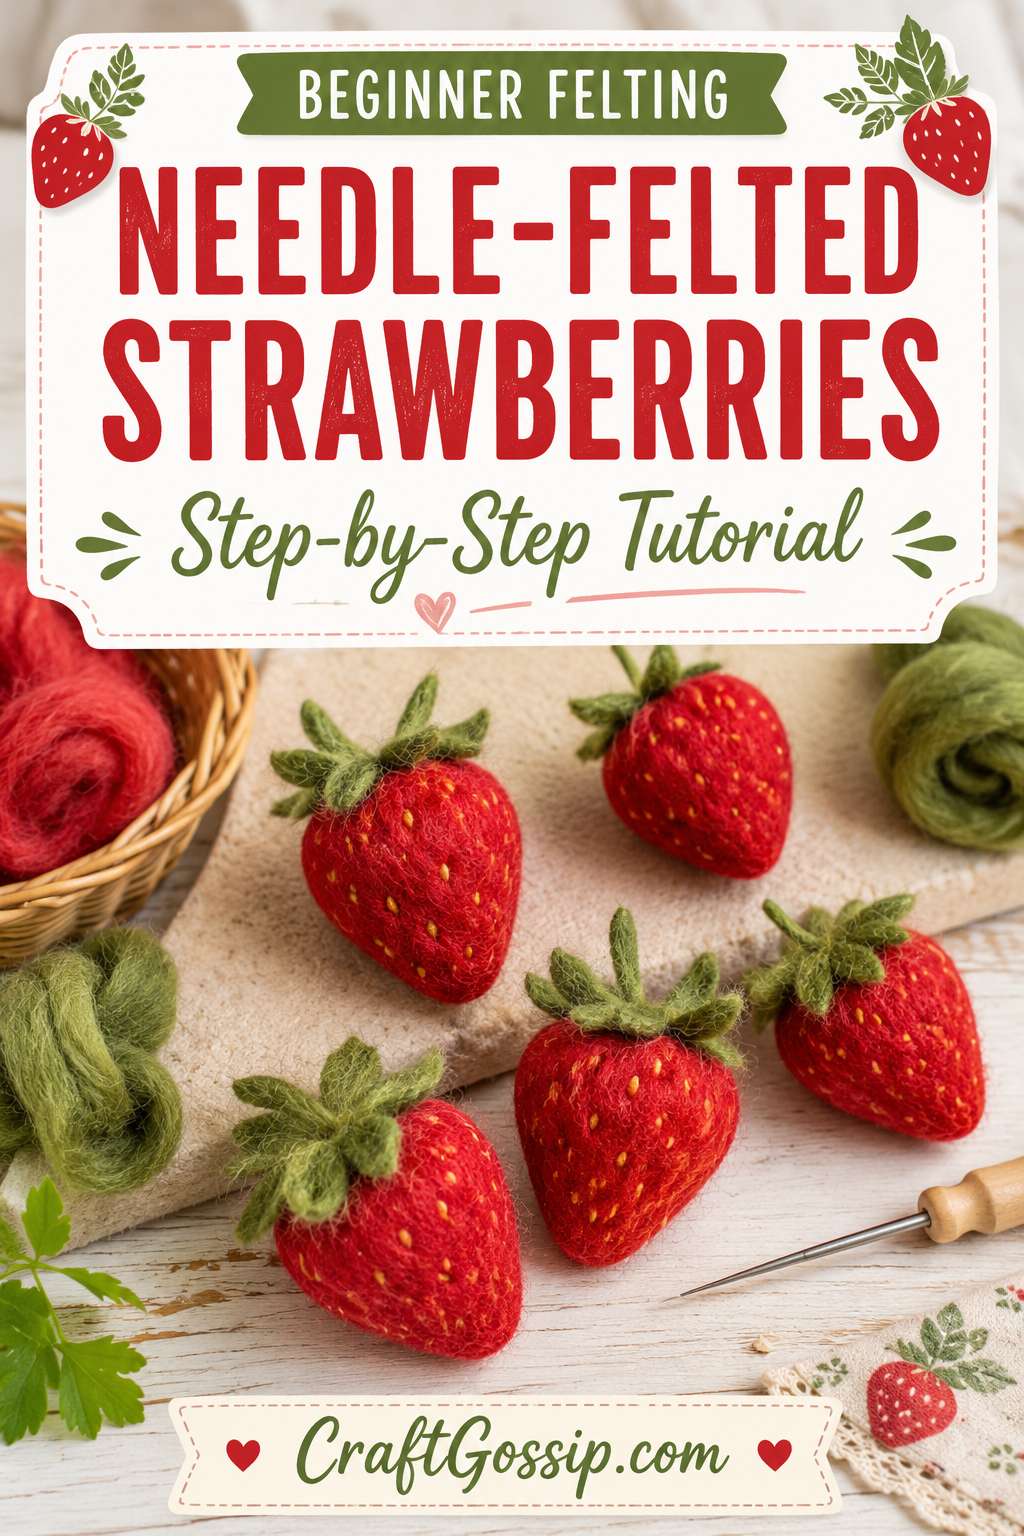
There is something about a bowl of tiny wool strawberries that makes me unreasonably happy.
They are bright, cheerful and forgiving enough for a beginner, yet they still teach several of the skills you will use in more advanced needle-felting projects. You will learn how to build a firm wool core, shape a rounded cone, cover it neatly with coloured fibre, attach tiny details and smooth the surface without flattening the whole thing into a sad red pancake.
Unlike many quick needle-felted strawberry tutorials, this version starts with an inexpensive core, adds individually felted seeds and shows you how to make separate leafy points that sit naturally over the top of the fruit.
Once you have mastered the basic strawberry, you can make an entire punnet and turn them into felt play food, brooches, bag charms, ornaments, pincushions or a cheerful summer garland.
Is a Strawberry a Good First Needle-Felting Project?
A strawberry is one of the best small needle-felting projects for beginners because the basic form is simple.
You are creating a rounded teardrop or soft cone rather than trying to match four legs, position a face or persuade two tiny ears to look as though they belong to the same animal.
This project teaches you how to:
- Roll and secure a loose wool core
- Create a firm three-dimensional shape
- Form a tapered point
- Add a smooth coloured outer layer
- Felt tiny surface details
- Make flat felted leaves
- Join separate wool pieces securely
- Reduce surface fuzz
- Correct lumps and flat patches
Do not worry about making every strawberry identical. Real strawberries are wonderfully irregular, which is very convenient when your first attempt comes out slightly rounder than planned.
Finished Strawberry Size
The finished strawberry will measure approximately 4–5 cm from the leafy cap to the bottom point.
The exact size depends on how much core wool you begin with and how firmly you felt it.
Loose wool shrinks considerably as the fibres become compressed, so your starting bundle should look noticeably larger than the strawberry you want to make.
Needle-Felted Strawberry Supplies
You will need:
- Natural core wool, carded wool or an inexpensive wool batt
- Red carded wool or wool roving
- Green wool for the leaves and stem
- A tiny amount of cream, pale yellow or light gold wool for the seeds
- One 36- or 38-gauge felting needle
- One fine 40-gauge felting needle
- Felting foam, wool mat or dense needle-felting pad
- Leather or silicone finger guards
- Small sharp embroidery scissors
- Sewing needle and strong thread, optional
- Brooch backs, hanging cord or keychain findings, optional
A beginner needle-felting kit from Amazon can be a practical way to collect the needles, foam mat and finger protectors in one purchase. Look for a kit that identifies the different needle gauges rather than supplying twenty identical needles and expecting you to develop psychic powers.
Which Wool Is Best for Needle-Felted Strawberries?
The wool you choose affects how quickly the strawberry firms up and how smooth the finished surface looks.
Core Wool
Use carded core wool, a wool batt or a medium-coarse wool for the inside of the strawberry.
Core wool is generally less expensive than brightly dyed fibre and allows you to save the good red wool for the visible outer layer.
Carded fibres point in different directions, so they tangle and compress readily. This makes them easier to sculpt than long, neatly aligned wool top.
Medium fibres such as Corriedale or Romney are practical choices because they felt relatively quickly and create a firm shape.
Red Surface Wool
Use red carded wool or short pieces of red roving for the outer layer.
Carded wool is usually easier for beginners because it can be applied in small overlapping wisps.
Combed roving can also be used, but pull it into short, feathered sections first. Wrapping one long strip around the core often leaves visible lines and ridges.
Our guide to wool batts versus roving for felting explains why these two preparations behave differently.
Green Wool
Choose a medium leaf green, olive, moss or sage.
Two similar shades can be blended together for more realistic leaves, but a single green works perfectly well.
Wool for the Seeds
Use the smallest wisps imaginable.
Cream, pale yellow, soft gold or light pink all work. Bright white can create a cute graphic look, although it may feel less natural.
Which Felting Needle Should You Use?
A medium or coarse needle is useful for building the core because it moves and compresses wool quickly.
A fine needle is better for the red surface, seeds and final smoothing.
A simple combination for this project is:
- 36- or 38-gauge triangular needle: shaping and firming the core
- 40-gauge triangular or star needle: adding colour, attaching seeds and smoothing
Needle gauges can be confusing because the higher number indicates a finer needle. Our guide to felting needle types and gauges is helpful when your collection has grown beyond the one needle that came with the kit.
Needle-Felting Safety
Felting needles are extremely sharp and have tiny barbs along their shafts.
Always work on a suitable felting mat and keep your fingers out of the needle’s path.
Push the needle straight into the wool and withdraw it along the same path. Bending, twisting or levering the needle sideways can cause it to snap.
Finger guards are especially useful when making the leaves and seeds because those small pieces bring your fingertips uncomfortably close to the needle.
Needle felting is not an unsupervised children’s activity. Older children and teenagers may enjoy it with close adult supervision and a clear understanding of the tools.
How to Needle Felt a Strawberry
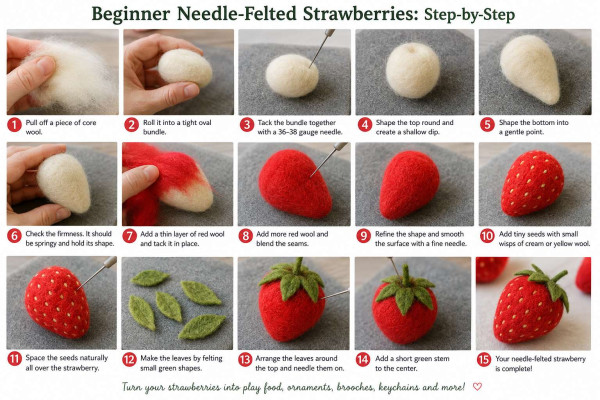
Step 1: Pull Off the Core Wool
Pull or tease away a strip of core wool.
Avoid cutting it with scissors. Torn wool has soft feathered ends that blend together more easily, while cut edges can create firm seams.
For a strawberry approximately 4–5 cm tall, begin with a loose handful of wool roughly the size of your palm.
Start slightly smaller than you think you need. It is easy to add more wool, but removing it after everything has been firmly felted is another matter entirely.
Step 2: Roll the Wool Into a Tight Bundle
Roll the wool firmly between your palms.
Tuck the sides inward as you roll, creating a compact oval or egg shape.
Keep hold of the loose end so the bundle does not spring open.
Place the bundle on your felting mat with the loose end facing upward.
Step 3: Secure the Core
Using a 36- or 38-gauge felting needle, stab straight down through the loose end to hold the rolled wool together.
Turn the bundle after every few stabs.
At this stage, concentrate on securing the fibres rather than perfecting the strawberry shape.
Work around the entire surface until the bundle holds together without unrolling.
Step 4: Build a Firm Oval
Continue needling the core while rotating it regularly.
Use deeper stabs to compress the interior and shorter stabs to firm the outer surface.
The wool should gradually become smaller, denser and more resistant.
Do not leave one side resting on the mat for too long. This is how an innocent strawberry turns into a flat-backed berry better suited to becoming a fridge magnet.
Step 5: Form the Rounded Top
Choose one end to become the top of the strawberry.
Keep this section broad and rounded.
Needle gently into the centre of the top to create a shallow indentation. This small dip will help the green leaves and stem sit naturally.
Do not create a deep hole. A slight depression is enough.
Step 6: Shape the Pointed Bottom
Turn the opposite end towards you.
Felt more heavily around the lower sides, gradually narrowing the bottom third of the core.
Rotate the strawberry after every few stabs so the taper remains even.
Leave the very end slightly extended, then felt directly into the tip to create a soft rounded point.
A strawberry should look more like a plump teardrop than a sharp party hat.
Step 7: Check the Core Firmness
Press the strawberry between your fingers.
It should feel firm and springy and should hold its shape without collapsing.
The core does not need to become rock hard, but there should be no large soft pockets beneath the surface.
Continue felting any squishy areas before adding the red wool.
This is one of the most important stages. Covering a loose core with red fibre may make it look finished temporarily, but the strawberry will remain lumpy and difficult to refine.
Step 8: Correct the Shape Before Adding Colour
Look at the core from the front, sides, top and bottom.
Correct any obvious lumps or flat areas now.
To fill a dip, place a small wisp of core wool over it and felt around the edges before firming the centre.
To reduce a bulge, concentrate the needle in that area while rotating the piece.
The shape should have:
- A broad rounded top
- Full upper shoulders
- Gently curved sides
- A tapered lower third
- A softly pointed base
How to Add the Red Wool
Step 9: Prepare Thin Wisps of Red Fibre
Pull off a small, fine piece of red wool.
Spread it gently between your fingers until the edges become wispy and almost transparent.
Several thin layers will produce a smoother finish than one thick layer.
Step 10: Cover the Top
Place the first red wisp over the rounded top of the strawberry.
Tack it in place using shallow stabs with a 38- or 40-gauge needle.
Wrap the loose fibres over the sides and secure them.
Avoid felting deeply enough to distort the firm core underneath.
Step 11: Cover the Sides
Add more small wisps of red wool around the strawberry.
Overlap the feathered edges slightly.
Needle around the edges first to anchor each piece, then lightly felt across the centre.
Continue until the natural core is completely covered.
Do not worry when the first red layer looks slightly patchy. A second very fine layer will even out the colour.
Step 12: Cover the Point
Place a thin piece of red wool across the bottom point.
Wrap it around the tip and needle it gently into place.
Turn the strawberry frequently so the point remains central.
Deep stabs directly into the tip will shorten and round it, while shallow angled stabs along the lower sides will sharpen the taper.
Step 13: Blend the Seams
Use your fingers to tease apart any visible edges where two pieces of red wool meet.
Overlap the fibres and blend them with short, shallow stabs.
When a line remains visible, place an almost transparent veil of red wool over it and felt that layer into the surface.
Do not simply keep stabbing harder into the seam. This usually creates a dent rather than making the line disappear.
Step 14: Add a Second Colour Layer
Cover any pale or uneven areas with very fine wisps of red wool.
You can also blend in a tiny amount of burgundy or deep pink wool around one side to create gentle colour variation.
Keep this layer thin. The strawberry should now look evenly coloured without losing its carefully shaped form.
How to Smooth a Needle-Felted Strawberry
Step 15: Switch to a Fine Needle
Use a fine 40-gauge needle for the final surface.
Make quick, shallow stabs over the strawberry while turning it constantly.
The needle only needs to catch and tuck the outer fibres. Deep stabbing at this point can leave visible holes.
Step 16: Tuck Loose Fibres
Hold long surface fibres lightly against the strawberry and needle along their length to tuck them into the wool.
Work in different directions rather than repeatedly needling the same path.
This helps avoid streaks and grooves.
Step 17: Trim the Longest Hairs
Once the strawberry is firm and evenly felted, use small sharp scissors to trim only the longest stray fibres.
Do not shave the entire surface.
Aggressive trimming can expose the pale core or leave obvious bald areas. A little woolly texture is normal and part of the handmade finish.
How to Add Strawberry Seeds
Step 18: Prepare Tiny Seed Fibres
Pull away a wisp of cream or pale yellow wool smaller than a grain of rice.
Roll it lightly between your fingertips to create a short narrow shape.
You need far less wool than you expect.
When you are reasonably sure the seed is too small to handle, it is probably about right.
Step 19: Attach the First Seed
Place the tiny wisp on the red surface.
Use the fine needle to make one or two careful stabs through the centre.
Tuck each loose end inward, creating a small oval or dash.
Use a finger guard or hold the seed with fine tweezers until it is anchored.
Step 20: Add Staggered Seed Rows
Continue adding seeds around the strawberry.
Arrange them in staggered rows rather than perfectly straight vertical lines.
Space them slightly farther apart near the bottom point and more closely around the upper half.
Rotate the berry while working so the seed pattern continues around every side.
Angle some seeds slightly to create a more natural look.
An Easier Seed Method
When the tiny pieces of wool are testing your patience, create seed dimples instead.
Place the fine needle where you want each seed and make several concentrated shallow stabs.
The indentation will catch the light and suggest a seed without requiring contrasting fibre.
You can also embroider small seed stitches using one strand of pale yellow embroidery floss after the berry has been completed.
How to Make the Green Strawberry Leaves
Step 21: Divide the Green Wool
Pull off a thin strip of green wool and divide it into four or five small sections.
Each piece will become one leaf.
Keep the fibres light and wispy. Thick leaves are much harder to shape and attach neatly.
Step 22: Felt the First Leaf
Place one section of green wool on the felting mat.
Fold the sides inward to form a narrow leaf.
Needle the centre and edges until the fibres begin holding together.
Leave one end loose and fluffy. These unfelted fibres will attach the leaf to the strawberry.
Step 23: Shape the Point
Fold the sides inward near the outer end.
Use small angled stabs to create a pointed tip.
Turn the leaf over carefully and felt the reverse side.
Lift it from the mat regularly so it does not become permanently attached to the foam.
Step 24: Add a Central Leaf Line
Use the tip of the fine needle to create a shallow line along the centre of the leaf.
This adds definition without requiring embroidery.
You can blend a tiny wisp of lighter green wool along the centre for extra detail.
Step 25: Make Four or Five Leaves
Repeat the process to create the remaining leaves.
Vary the length and width slightly so the leafy cap looks organic.
The leaves do not need to be extremely firm. A little flexibility helps them curve over the berry naturally.
How to Attach the Strawberry Leaves
Step 26: Arrange the Leaves
Place the leaves around the shallow indentation at the top of the strawberry.
Point them outward and overlap the fluffy bases in the centre.
Try the arrangement before attaching anything permanently.
Five leaves create a classic strawberry cap, but four or six can look just as lovely.
Step 27: Attach the Leaf Bases
Hold one leaf in position and needle the loose base fibres deeply into the strawberry.
Repeat with the remaining leaves.
Work around each base until it feels firmly attached.
Leave the pointed ends slightly raised rather than flattening every leaf against the red surface.
Step 28: Cover the Centre
Place a tiny wisp of green wool across the middle of the leafy cap.
Needle it down to hide the joins and strengthen the attachment.
Deepen the central indentation slightly if the leaves appear to be perched awkwardly on top.
How to Add a Felted Stem
Step 29: Roll the Stem Wool
Pull off a very small piece of green wool.
Roll it between your fingertips to create a short cord.
Keep one end loose and fluffy.
Step 30: Firm the Stem
Place the stem on the felting mat.
Needle along its length while rolling it gently.
Do not felt the loose end.
Make the stem approximately 1–2 cm long for play food or a decorative strawberry.
Step 31: Attach the Stem
Position the fluffy end in the centre of the green leaves.
Needle the loose fibres deeply into the berry.
Add another tiny wisp of green wool around the base when extra support is needed.
How to Avoid a Fuzzy Finished Strawberry
Surface fuzz is one of the most common beginner frustrations.
Some fuzz is normal, especially when using soft Merino wool, but these steps will produce a neater finish.
Begin With a Firm Core
A soft core shifts beneath the needle and makes the outer layer difficult to smooth.
Add Thin Colour Layers
Thick pieces of wool create ridges, folds and uneven colour.
Use Short Pieces of Roving
Long fibres wrapped around the berry can form visible lines.
Change to a Fine Needle
A 40-gauge needle tightens the surface without leaving large holes.
Use Shallow Stabs
Once the shape is established, concentrate on the outer fibres rather than repeatedly piercing the entire core.
Cover Seams Instead of Attacking Them
Place a fine veil of matching fibre over stubborn lines.
Trim Sparingly
Cut only the longest loose hairs after the wool has been thoroughly felted.
Needle-Felted Strawberry Troubleshooting
My Strawberry Looks Like an Egg
The bottom has not been tapered enough.
Concentrate your needle around the lower third while rotating the piece. Keep the upper section rounded and full.
My Strawberry Looks Like a Cone
The top needs more volume.
Add a small wisp of red or core wool around the upper sides and blend it into the surface.
Strawberries should have rounded shoulders rather than straight sloping sides.
The Bottom Point Is Too Sharp
Needle directly into the tip to compress and round it.
You can also wrap a tiny wisp of red wool over the point and blend it in.
One Side Is Flat
Add a thin pad of matching wool to the flat area.
Felt around its edges first, then blend the centre into the surrounding shape.
Rotate the strawberry more frequently during the rest of the project.
The Core Is Still Squishy
Continue felting with the medium needle before adding more details.
When the strawberry has already been covered with red wool, use deeper stabs in the soft areas and then repair the surface with another fine layer of red.
The Red Layer Has Visible Stripes
The fibres were probably applied in long aligned strips.
Cover the lines with small crossed wisps of red wool and blend them with a fine needle.
The Needle Leaves Large Holes
Switch to a finer needle and use shallower stabs.
Gently rub the surface between your fingertips to lift the compressed fibres, then lightly needle them again.
The Seeds Look Like Polka Dots
Use less wool for each seed and felt the ends inward to create narrow ovals.
You can remove a large seed by carefully lifting it with the tip of the needle and pulling it away with tweezers.
The Leaves Are Too Thick
Pull the green fibre into thinner sections and felt both sides.
When the finished leaves are already thick, continue compressing the centre and edges before attaching them.
The Leaves Keep Falling Off
The bases may have been felted too firmly before attachment.
Place a fresh wisp of loose green wool across the centre and needle it through the leaf bases into the strawberry.
My Felting Needle Keeps Breaking
The needle is probably being bent or twisted inside the wool.
Insert it straight and withdraw it at the same angle. Rotate the project rather than changing the needle direction while it is embedded.
How Long Does It Take to Needle Felt a Strawberry?
A first strawberry usually takes approximately 60–90 minutes.
The core and surface smoothing generally take the longest. Once you understand how firm the wool needs to become, later strawberries will be considerably faster.
Very small decorative strawberries may take 30–45 minutes, while larger realistic versions with detailed colour blending may take several hours.
Needle-Felted Strawberry Variations
White Strawberry
Use cream or ivory wool with pink or red seeds.
Add pale green leaves for a delicate spring look.
Blush Strawberry
Blend pale pink, coral and red wool across the surface.
This is especially pretty for nursery decorations or Valentine’s Day crafts.
Wild Strawberry
Make a smaller, rounder berry with prominent seeds and a slightly elongated green cap.
Chocolate-Dipped Strawberry
Felt a finished red strawberry, then add dark brown wool over the pointed lower half.
Create an uneven curved edge where the “chocolate” meets the fruit.
Add a thin cream wool drizzle if you enjoy tiny details and testing your eyesight.
Kawaii Strawberry
Use bright red wool, evenly spaced cream seeds and a simple five-pointed green cap.
Add tiny black wool eyes and a pink smile for a playful character.
What Can You Make With Felted Strawberries?
Felt Play Food
Make several strawberries in slightly different sizes and shades.
Place them inside a small wooden punnet or handmade felt basket.
Needle-felted items made for children should not contain exposed wire, beads or easily detached findings. Check them regularly for damage or loose fibres and keep them away from babies and children who still mouth toys.
CraftGossip’s needle-felted fruit collection includes more inspiration for building a colourful wool fruit bowl.
Strawberry Brooch
Create a slightly flatter berry so it sits comfortably against clothing.
Sew a locking brooch back firmly to the reverse using strong thread.
Add a small oval of matching craft felt beneath the brooch finding for extra stability.
Strawberry Keychain or Bag Charm
Sew a strong folded cord beneath the leafy cap before attaching the keychain ring.
Do not push a jump ring directly through the wool and expect it to remain secure. Repeated movement can gradually pull the fibres apart.
Hanging Strawberry Ornament
Thread strong embroidery floss through the top of the berry.
Tie a loop and hide the knot beneath the leaves.
Red strawberries look lovely mixed with mushrooms, hearts and woodland ornaments on a Christmas tree.
Felted Strawberry Garland
Make an odd number of strawberries and alternate them with small green or cream felt balls.
Pass strong cord horizontally through the upper third of each berry using a long doll needle.
Our needle-felted garland tutorial shows how small felted shapes can be combined into a decorative hanging piece.
Strawberry Pincushion
Create an oversized strawberry with an extra-firm core.
Place it in a tiny basket or felt leaf base.
Use ordinary sewing pins in the finished pincushion rather than storing fragile felting needles inside it.
Bowl Filler
Make strawberries in red, burgundy, coral and pink.
Arrange them in a wooden bowl with loose felt leaves for a cheerful summer table decoration.
Handmade Gift Toppers
Attach a small strawberry to ribbon wrapped around a jar, gift box or handmade jam-themed hamper.
The recipient can later remove it and use it as an ornament.
Frequently Asked Questions
Can I Make the Whole Strawberry From Red Wool?
Yes.
Using core wool simply reduces the amount of coloured fibre required and may help you build a firmer shape more economically.
Can I Use Acrylic Fibre?
Acrylic craft fibre does not felt in the same way as natural animal fibre because it lacks the microscopic scales that allow wool to lock together.
Choose wool or another fibre specifically sold for needle felting.
Is Merino Wool Suitable?
Merino can create a beautifully soft and smooth surface, but its fine fibres may take longer to firm.
Many beginners find a medium wool easier for the core and use a fine Merino layer only on the outside.
Can I Use a Multi-Needle Tool?
A multi-needle tool can speed up the early core stage, particularly on a larger strawberry.
Switch to a single needle for shaping the point, attaching leaves and adding seeds.
Never use a multi-needle tool close to your fingers or on a very small detail.
Why Is My Finished Strawberry Much Smaller Than Expected?
Needle felting compresses air from the wool, so the bundle shrinks considerably.
Add more core wool in thin layers until the strawberry reaches the size you want.
Can the Strawberry Be Washed?
Needle-felted decorations should generally be spot cleaned carefully with cool water.
Rubbing, soaking or machine washing can distort the shape and encourage surface fuzz.
Allow the strawberry to air dry completely.
A Beginner Project Worth Making More Than Once
Your first strawberry may be a little round, slightly fuzzy or equipped with leaves that seem determined to point in five different directions.
Make another one.
The second strawberry is where your hands begin to understand how the wool responds. By the third, you will recognise the correct core firmness and shape almost without thinking about it.
That is one of the loveliest things about needle felting. The materials are simple, the technique is repetitive and every small project quietly improves the next one.
Before long, one beginner strawberry becomes a whole punnet—and then you start wondering whether you have the right wool colours for pears, peaches and blueberries.