If you’ve ever wanted a Christmas craft that’s equal parts therapeutic, squishy, and downright adorable — this is it. Wet felted wool ornaments made with cookie cutters are the perfect blend of hands-on fun and creative freedom.
This is one of those classic projects I love doing with kids, grandkids, or even on my own when I need a mindful break from the Christmas chaos. It’s simple, colorful, and leaves your kitchen smelling like soap and wool instead of gingerbread — though both pair nicely with a cup of tea and holiday music in the background.
Why You’ll Love This Project
- It’s perfect for beginners and kids (ages 5+ with supervision).
- Uses basic materials you likely already have.
- Makes durable, natural ornaments that will last for years.
- Great for group crafts — classrooms, craft fairs, or holiday parties.
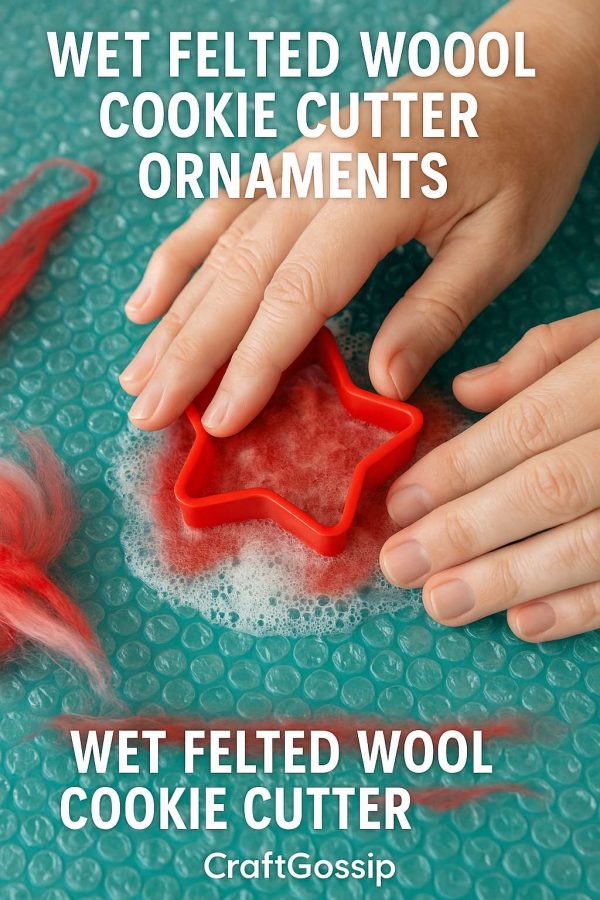
What You’ll Need
- 100% wool roving or batting (in festive colors)
- Cookie cutters (metal or plastic – stars, hearts, trees, bells, etc.)
- Warm water and a mild soap (dish soap or castile)
- Small bowl or basin
- Towels or absorbent cloth
- Needle and thread or ribbon for hanging
- Optional: glitter wool, silk fibers, or embroidery for decoration
Step-by-Step: How to Make Wet Felted Cookie Cutter Ornaments
1. Set Up Your Workspace
Cover your table with a towel or tray to soak up the water. This project gets a little messy (in the best way).
2. Fill the Cookie Cutter
Place your cookie cutter flat on the towel. Pull small tufts of wool and layer them inside the shape, alternating directions — this criss-cross method helps the fibers tangle evenly.
Don’t overpack it; the wool will shrink as it felts.
3. Add Soapy Water
Dip your fingers into warm soapy water and sprinkle or spray it gently over the wool. Press down lightly to wet all the fibers without flooding.
4. Start Felting
Now comes the fun part! Gently press and rub the surface of the wool in small circles. You’ll feel it start to bind and shrink. Kids love this part because the transformation is almost magical.
Keep adding water as needed and press evenly so the shape stays neat inside the cutter.
5. Check the Felt
When it feels firm and springy (like a dense sponge), carefully remove it from the cookie cutter. Keep felting and rolling it in your hands to tighten the fibers.
6. Rinse and Dry
Rinse your ornament in cool water, squeeze gently, and roll in a towel to remove excess moisture. Lay flat or hang to dry completely overnight.
7. Decorate and Hang
Once dry, thread a ribbon or string through the top. You can also add embroidery stitches, beads, or needle-felted details for extra personality.
Kid-Friendly Variations
- Sparkly Snowflakes: Mix white and silver wool and sprinkle with a bit of metallic fiber.
- Rustic Hearts: Blend natural wool tones for a farmhouse look.
- Mini Garlands: String smaller shapes together for a whimsical wooly banner.
These also make eco-friendly gift toppers or ornaments for handmade cards.
Felting Tips from Experience
- Use warm water — it speeds up the felting process.
- Don’t skip the alternating fiber directions — it’s the key to strong, even felt.
- Wool shrinks around 25–30%, so plan your sizes accordingly.
- If your felt isn’t firm enough, rewet and rub again.
Why Wool Cookie Cutter Ornaments Are a Keeper
This project beautifully bridges old-fashioned crafting and modern creativity. It’s sensory, sustainable, and simple enough to share with little helpers.
Each ornament comes out unique — just like Christmas memories. So put on your apron, grab your wool, and let a little festive felting magic happen right at your kitchen table.
Keywords naturally included: wet felted wool ornaments, cookie cutter felt