If you’ve ever wanted to create something beautiful and functional with wool, this soft, rounded catch-all bowl is the perfect project. Using the wet felting resist method, you’ll learn how to sculpt natural fibers into a bowl that’s sturdy enough for keys, jewelry, or even decorative display. It’s a hands-on, meditative craft that combines the rhythm of felting with the joy of shaping — and no two bowls ever turn out quite the same.
(Tip: If you’re completely new to felting, try a simple flat project first, like a felt coaster or trivet, before jumping into 3D forms.)
What You’ll Need
Felting Tools & Supplies:
- Bubble wrap or solar pool cover (for rolling and working surface)
- Foam packing sheet or flexible plastic (for resist)
- Permanent marker
- Spray bottle or ball brauser
- Large bowl or bucket (4L capacity)
- Liquid soap (Murphy’s Oil Soap, dish soap, or olive oil soap)
- Towels (one for mopping, one for under your work)
- Tulle netting or mesh fabric (to help control fibers while wetting)
- Pool noodle (for rolling, optional)
Felting Fibers:
- 25–30g fine Merino wool roving (color of your choice)
- Optional: silk fibers, yarn scraps, or locks for surface texture
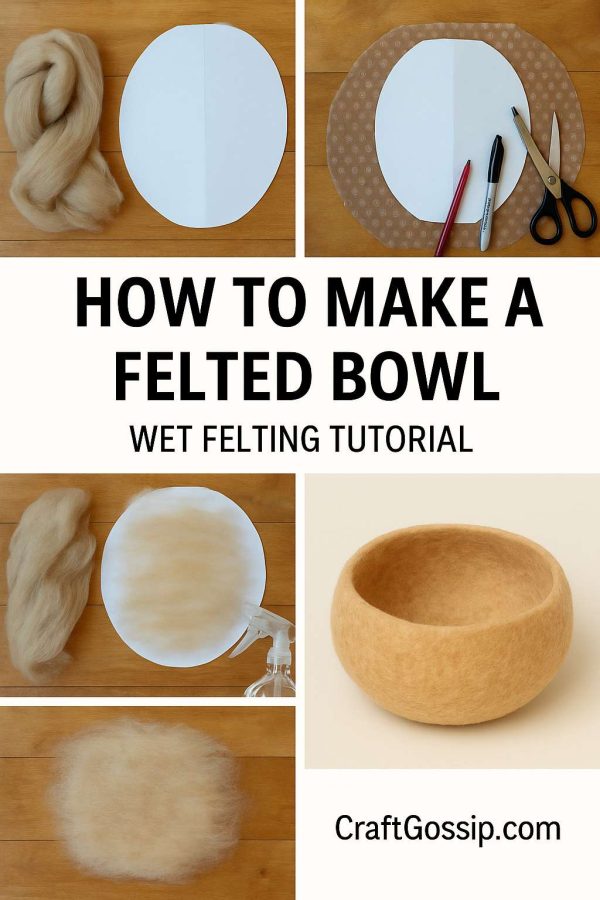
Step 1: Create Your Bowl Template
Start by drawing a circle on a sheet of paper — around 10 inches (25 cm) in diameter for a medium-sized bowl. Remember that wool shrinks about 30–40%, so make your template about 1.5 times larger than your intended final size.
Trace this circle onto your foam packing sheet and cut it out. This piece will serve as your resist, keeping the two sides of your bowl separate until it’s ready to be shaped.
Step 2: Set Up Your Felting Surface
Lay a towel on your table and place the bubble wrap (bubbles facing up) on top. Keep your resist nearby, along with a spray bottle filled with warm, soapy water.
This setup will help you control moisture and friction without making a mess — felting is gloriously messy, but we can at least try to contain it!
Step 3: Lay Out the First Layer of Wool
Pull small, even tufts of wool and begin laying them out in a circular pattern slightly larger than your resist. Let the edges extend about 1 inch past the resist outline. Lay the fibers horizontally for your first layer, then vertically for the second layer, and diagonally for the third.
You’ll want 3 thin, even layers per side.
Step 4: Wet and Flatten the Wool
Spritz the wool with your soapy water until it’s evenly damp, then cover it with tulle or mesh and gently pat it down with your hands to flatten and smooth it. The fibers should cling together but still feel slippery.
Step 5: Add the Resist and Build the Second Side
Carefully lay your resist on top of the damp wool. Fold the excess wool from the edges over the resist — this will prevent open seams later.
Flip the whole piece over, and just as before, layer wool on the second side (three layers, alternating directions). Wet it down, smooth with your hands, and check that all edges are covered.
Step 6: Begin Felting
Cover the entire piece with bubble wrap and start rubbing gently in small circular motions. As the fibers begin to knit, gradually increase the pressure.
Focus on edge management — you want smooth transitions around the sides so your finished bowl has a neat, rounded shape. Alternate sides every few minutes to keep it even. Continue rubbing for 15–20 minutes, rewetting as needed.
Step 7: Check the Felt and Remove the Resist
Do a quick pinch test — if the fibers lift easily, it needs more felting. Once the surface feels firm and unified, cut a small opening at the top and carefully remove the resist.
Massage the opening edges with warm soapy water to smooth and strengthen the rim.
Step 8: Shape the Bowl
Now comes the fun part! Use your hands to gently stretch and form the bowl into shape. You can round the base by pushing outward from the inside while smoothing the outside surface.
To create a flat bottom, press the base onto your work surface and rub in a circular motion.
Step 9: Fulling and Finishing
To firm up the fibers, roll the bowl in your hands or gently toss it onto your towel to help shrink and strengthen it. Once it feels sturdy and evenly felted, rinse out the soap with cool water and gently squeeze out excess moisture.
Shape it once more — round out the sides, adjust the rim — and leave it to dry on a towel for 24–48 hours.
Step 10: Optional Decoration
Once dry, you can needle-felt designs, stitch embroidery, or even dye the surface for a pop of color. Try blending natural tones for a Scandinavian look, or add hand-dyed locks for rustic texture.
CraftGossip Tip
Felted bowls make gorgeous handmade gifts — use them for keys, yarn scraps, jewelry, or even a tiny potted plant. If you make several in coordinating colors, they look stunning grouped together on a shelf.